

Pilots often have a lot to do when flying and aircraft trim helps pilots manage that workload and keep the aircraft moving in the right direction. It can be a pilot’s best friend! So what is aircraft trim?
Aircraft trim holds control surfaces (rudder, elevator, or ailerons) in a specific position, requiring less manual input from the pilot to maintain a desired flight attitude. Trim either moves entire control surfaces (like on a stabilator) or is installed as a separate trim tab (like on an elevator).
One of the biggest benefits of using trim is the reduction of pilot workload, both physically and mentally. Part of being a safe and proficient pilot is understanding what trim is, how it works, and how to use it.
What is aircraft trim?
Aircraft trim is an adjustment to the control surfaces.
Better said, we can replace the word trim with “adjust” and get a similar meaning.
When we “trim” an aircraft, we are adjusting one or more of the movable control surfaces so that the pilot doesn’t need to hold them with physical strength and can focus elsewhere.
Aircraft trim can be controlled directly by the pilot to adjust inflight operation of the trim devices by using mechanical means such as an elevator or rudder trim wheel, by a servo motor actuated by the pilot through an electrical switch such as with aircraft that use “powered trim” or indirectly by the pilot through the autopilot which would then also use servo motors to control the trim functions.

There are many different types of aircraft trim and they all share the same purpose of keeping the aircraft on the intended flight path flying predictably, efficiently, and safely and with limited pilot interaction.
Why is trim used on aircraft?
Aircraft trim is useful to reduce the effort required to keep a movable control surface in any given position at a certain and specific airspeed by deflecting the air moving around it.
Aircraft trim can and must be adjusted during the flight as conditions warrant.
Correctly applied trim helps reduce control pressures that would normally be felt by the pilot (or servo) typically by a need to constantly push or pull the yoke or stick constantly to maintain pitch and altitude, having to apply and maintain foot pressure to the rudder to control yaw or to apply and maintain aileron deflection to maintain a wings level bank.
Without the proper use of trim, holding and maintaining control surfaces manually can lead to physical and mental pilot fatigue, pilot distraction from other duties, inconsistent control surface deflection leading to an erratic flight path and premature or accelerated wear on the control surface linkage to the cockpit such as the wire ropes (often called cables), pulleys, pins and bearings which can lead to increased maintenance and inspection costs and reduced service life of the impacted components.
Elevator trim
The most common trim is elevator trim which we can find in many aircraft regardless of age, manufacturer or type of aircraft.
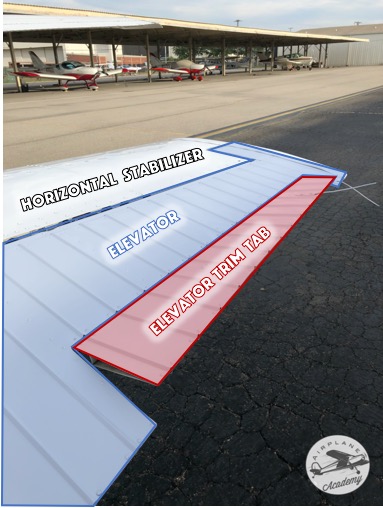
The elevator is a control surface on the tail that raises or lowers the nose of the aircraft.
Elevator trim helps reduce the amount of control pressure needed to keep the elevator in a certain position.
How Elevator Trim Works
The elevator trim is usually a small separate part of the elevator (called a “trim tab”) that helps the pilot move the elevator to the required position and keep it there.
For aircraft equipped with stabilators, the trim actually moves the entire stabilator and is not a separate trim tab.
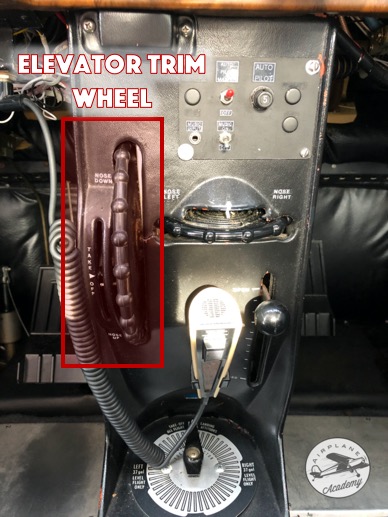
Elevator trim is actuated typically by a trim control wheel in the cockpit, or it can also be electrically driven (usually via a switch on the pilot’s yoke), or automatically by servos controlled by an autopilot.
What is interesting (and counterintuitive) about how elevator trim works is that the trim tab actually creates opposite deflection to the direction of the elevator.
To point the aircraft nose upward, this would require upward deflection of the elevator that pushes the tail down and the nose up. To accomplish this through trim, the trim tab would actually have downward deflection to push the elevator upward.
Here is an image with the trim fully deflected in the “nose up” position (note that the elevator was held level just to more clearly show what the trim tab is doing… in actual flight this would cause the elevator to deflect upward).
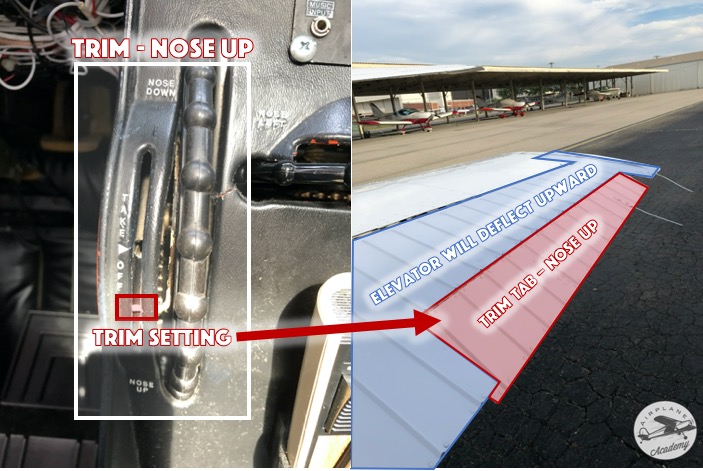
The trim tab here is shown deflecting a small amount of passing air downward so that reciprocal effect (while flying) will be for the trim tab to push the rear of the elevator up, pushing the tail down and the nose up.
The opposite happens with nose down trim, pictured below.
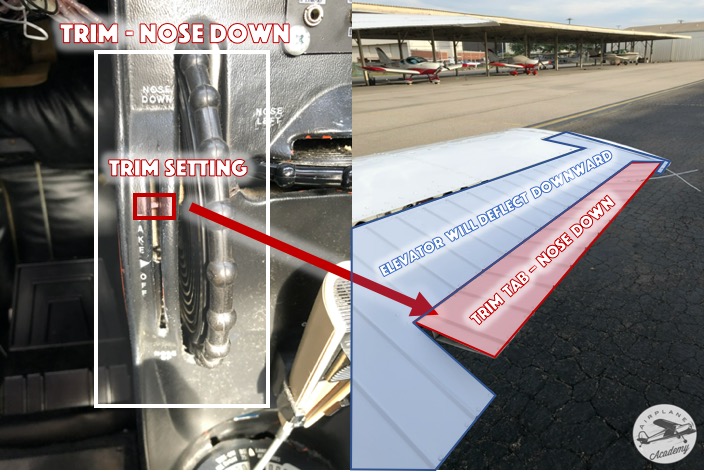
Note that while flying, this upward deflection of the trim tab would cause the elevator to deflect downward, thus pushing the tail up and the nose down.
When to Use Elevator Trim
Elevator trim can be used as much as needed to relieve the amount of control pressure needed to keep the elevator in a certain position. Elevator trim is put to work during climbs, cruise, and descents/landings alike.
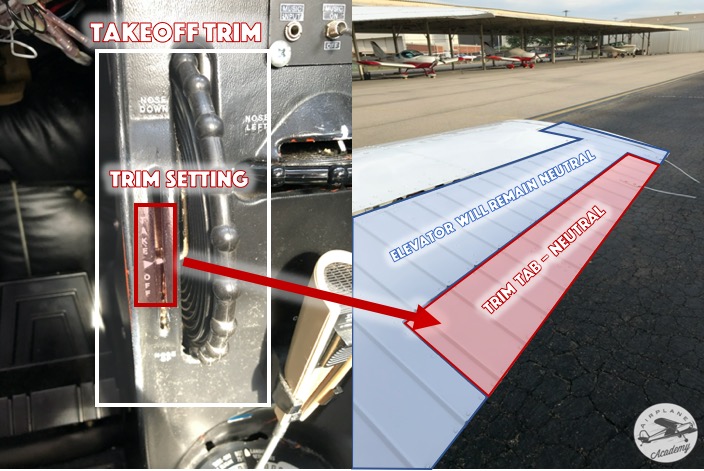
Elevator Trim at Takeoff
Aircraft will typically have a desired elevator trim setting for takeoff. This will be listed in the Pilot’s Operating Handbook (POH) and is also sometimes visually presented on the trim wheel itself, or digitally in some glass instruments.
This is a critical pre-takeoff checklist item to make sure your elevator trim is properly set!
Also be sure to use the manufacturer’s checklist to test electric trims before takeoff. You may find that the electric trim simply doesn’t work, or you may find that once it starts moving, it doesn’t stop. This is called runaway trim and if this happens in flight it can be a difficult situation.
Elevator Trim in the Climb
A climb typically begins when the pilot pulls back on the yoke and deflects the elevator upward, pushing the tail downward and raising the nose of the aircraft.
Two things can quickly happen during the climb: the pilot’s arm gets tired from pulling on the yoke, and he also gets distracted.
Applying nose-up trim (see image above) takes the place of the pilot physically applying back pressure to the elevator.
It reduces the physical workload on the pilot but also reduces mental workload. With the airplane now climbing on its own, the pilot is also mentally freed up to focus on other pertinent tasks.
Elevator trim will need to be adjusted periodically during the climb.
When the climb first begins, the airplane has more inertia from straight and level flight, and does not need significant elevator input for the climb because there is more air flowing over the control surfaces.
As the aircraft climbs and slows, more elevator deflection (and thus trim) will be required to maintain the climb.
As the aircraft enters less dense air with higher altitude, more trim may be required to maintain the climb as well.
But overall, elevator trim can help the airplane to nearly climb on its own with little input from the pilot. It’s like having another set of hands or a copilot onboard!
Elevator Trim in Cruise
Elevator trim is extremely useful during the cruise phase of the flight to maintain level altitude without the pilot needing to touch the yoke.
Aircraft equipped with electrim trim and an autopilot might autotrim the aircraft to reduce servo pressures on the control surfaces.
Some autopilots (like the STEC-30) will notify the pilot that more manual upward or downward elevator trim is required to reduce servo input, but will not actually adjust the trim automatically.
As cruise continues, the pilot might need to slightly retrim the aircraft to compensate for weight and balance changes due to fuel burn.
Elevator Trim in Descent/Landing
Trimming the aircraft during descent is similar to climb. The pilot can set a desired descent rate and appropriate power setting and the appropriately trimmed aircraft will fly itself during the descent.
Possibly the most helpful use of trim is during the landing phase of the flight.
It is a common technique to use pitch (using elevator trim) to achieve a certain airspeed, and use power/throttle adjustments to control altitude and descent rate. That technique can be seen and elaborated upon in this video:
Rudder Trim
Rudder trim is quite common on general aviation aircraft.
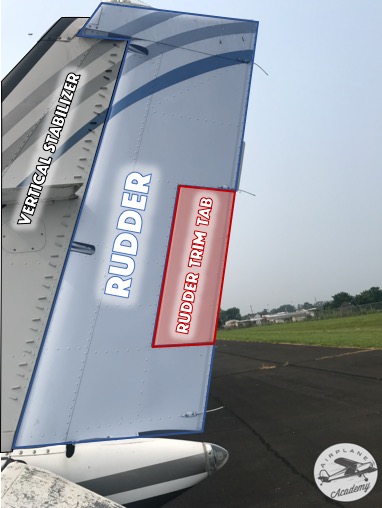
The rudder is a control surface usually mounted at the rear edge of the vertical stabilizer that swings left and right pushing the tail left and right thereby moving the nose of the aircraft left and right.
The rudder is controlled by foot pedals at the pilot’s feet, pushing the right pedal moves the nose to the right and pushing the left pedal moves the nose to the left.
Rudder trim helps reduce the amount of control pressure needed to keep the rudder in a certain position.
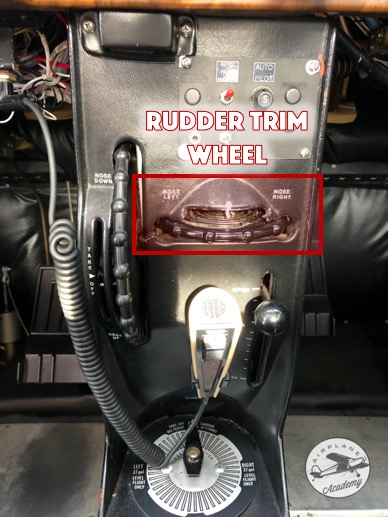
How Rudder Trim Works
Rudder trim is very similar to elevator trim, just applied on a different axis. Often the rudder will have a rudder trim tab (pictured below) that creates opposite air deflection to the rudder and pushes it in the desired direction.
Many small aircraft will have the rudder trim incorporated into the entire rudder, meaning that an adjustment in trim slightly changes the direction of the entire rudder itself, instead of through a trim tab. The Cessna 182 is an example of this.
Permanent Rudder Trim
Some aircraft designers build in a permanent anti-torque rudder trim tab to reduce the pilot and rudder trim workload at all speeds.

This permanent and fixed trim device is usually mounted at the far rear of the aircraft on the rudder itself and is bent to a specific shape and in a direction that benefits the overall aircraft design with no pilot input required.
In the case above, the permanent tab is mounted at the base of the rudder and is pointed such that the passing air will push the trim tab to the right, thereby pushing the rudder to which it is firmly attached to the right and replacing some of the right rudder the pilot would otherwise need to apply with a foot or through the rudder trim control.
When to Use Rudder Trim
Rudder trim is mostly used during climbs, descents, and possibly emergency scenarios of twin engine aircraft.
Rudder Trim During Climb
Due to p-factor (the asymmetric thrust generated by a propeller where one side of the propeller is taking a bigger “bite” of air than the other due to the pitch of the aircraft), single engine piston aircraft have a left turning tendency during climb.
Applying right rudder trim can help alleviate a tired right foot constantly pushing on the right rudder pedal during this phase of flight.
Rudder Trim During Descents
Due to p-factor, single engine piston aircraft have a left yaw tendency during descents (the opposite of climbs), and left rudder trim can be applied to correct this.
Rudder Trim in Engine Loss
When flying twin engine aircraft, the loss of one engine will create heavy yaw in the direction of the lost engine due to asymmetric thrust. In addition to heavy rudder application, rudder trim can help alleviate some of the pressure required to keep the airplane coordinated, though additional rudder pressure from the pilot will likely still be required.
Aileron Trim
Ailerons control the roll of the aircraft. Knowing how trim works on the elevator and the rudder, let’s take a look at the aileron trim.
How Aileron Trim Works
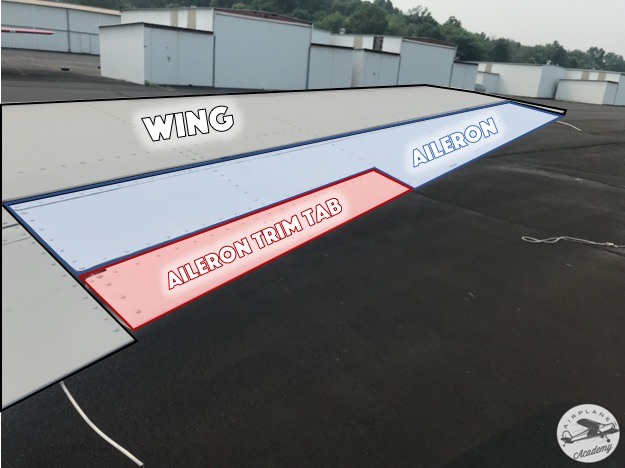
For airplanes equipped with aileron trim, the ailerons sometimes have an aileron trim tab (pictured below) that creates opposite air deflection to the aileron and pushes it in the desired direction.
For some aircraft like the Cirrus SR22, aileron trim will actually just move the entire aileron (similar to trim on a stabilator or some rudders) and do not have trim tabs.
Because the two main wings are actually one wing, if one wing rises and the other must fall. For this reason you may see aileron trim tabs on only one aileron or sometimes they will be on both if the aircraft was designed that way. Even in single installations, the aileron trim still affects both wings simultaneously.
When to Use Aileron Trim
Aileron trim can be used whenever the aircraft will not maintain straight flight. Sometimes airplanes can develop slight roll tendencies to one side or the other for a number of reasons (minor dents, stretching and re-rigging of the control surface cables, change of onboard equipment) and will require slight but perpetual aileron trim to correct it.
The larger need for aileron trim comes from the weight and balance of the aircraft (passenger, crew, and fuel loading and configuration). The need for aileron trim could also change during the course of the flight as fuel is burned off and the weight and balance of the aircraft changes.
How to Properly Use Trim
A safe and accurate way to trim an aircraft (elevator, rudder, or aileron) is to achieve the desired flight attitude with the yoke (or stick) and then slowly trim the aircraft until the yoke pressure is no longer needed to maintain the same attitude.
In other words, set the airplane in the desired attitude and then use trim to hold the airplane in that attitude where your input is no longer required.
It is important to not use the trim adjustment wheel, crank handle or other device to force the airplane to fly as you want.
Critically, the order of application for all movable trims such as this is to use the pilots own effort to get the aircraft in the correct yaw, pitch and bank attitude, then use the trim to relieve the trim pressures required, checking and adjusting always in this same order.
Always consult the POH for guidance on trim usage in your aircraft.
Final Thought
The proficient and consistent use of aircraft trim is a useful and often necessary tool for all pilots, and especially for those pilots who fly at night, in heavy traffic areas such as Class C or B airspaces or in IMC where pilot workloads can quickly become overwhelming.
Aircraft trim is designed to ease that workload while also adding to the efficient, safe and fun operation of your aircraft.


