
The Cessna 172 in one guise or another appears in nearly every pilot’s logbook over the course of their flying career, and there are good reasons for that. The humble 172 makes for a good trainer, a respectable if not outstanding cross-country machine, a solid IFR platform and so on.
So, it’s unsurprising that it is so ubiquitous in the general aviation fleet. Undoubtedly, then the question is how do you land one like a professional? Landing the Cessna 172 isn’t hard, but there are some tips you can use today to turn acceptable landings into great landings. Here are 10 Cessna 172 landing tips you can start implementing today:
- Fly a Consistent Pattern
- Fly the Right Airspeed on Final Approach
- Fly the Airplane Through the Entire Flare
- Get the Nose Up and Keep the Nose Straight During the Flare
- Keep Flying After Touchdown
- Crosswind Landings Are Normal Landings with Extra Finesse
- Bounces, Balloons, and Floats are Flare Entries
- Short Fields Need Short Aim Points
- Soft Fields Need Soft Touchdowns
- Instrument Approaches Are Stable, Power-On Approaches
Tip #1: Fly a Consistent Pattern
Just like the 182, there are a set of standard configurations and speeds to use in the pattern that will lead to stable, predictable and most importantly, consistent approaches. The configurations changes are all pretty similar (check out the 9 actionable 182 landing tips):
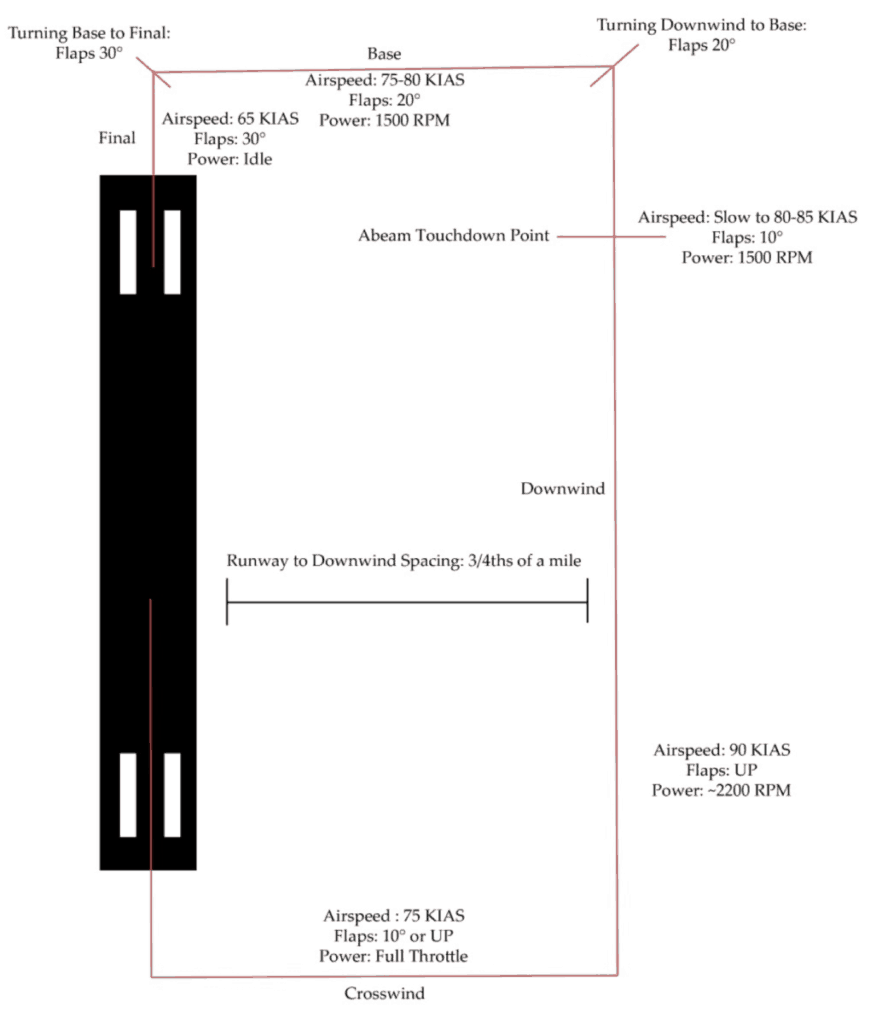
Figure 1: Traffic Pattern Speeds and Configurations
Consistency is the key to a good landing; think about the landing as starting on downwind (or at the Final Approach Fix for instrument pilots). Beginning on downwind, fly 90 knots at about 3/4ths of a mile from the runway, abeam your touchdown point reduce the power smoothly to 1,500 RPM, and select flaps 10°. Resist the initial pitch up tendency and let the nose settle slightly below the horizon.
Continue downwind long enough to account for the wind of the day turn to the base leg; during the entry to the turn, select flaps 20° and maintain 75 to 80 knots. The base leg is the time to make any adjustments to the approach. Add or reduce power, increase or decrease the crab angle as necessary to allow a power off approach to the runway.
Turn to line up with the runway for the final approach, and select flaps 30°. When you are established on final reduce the power smoothly for idle and slow to the final approach speed of 65 knots. Maintain 65 knots all the way to the flare.
This pattern technique yields a steep tight pattern that 1) allows a glide to the runway from any position beyond the crosswind leg, 2) sharpens short field approach skills, and 3) minimizes the number of variables to coordinate.
Remember that throughout the approach, and particularly on final, pitch controls airspeed, power controls altitude.
The power-off approach technique eliminates any secondary airspeed changes from power settings, allowing the pilot to focus on pitch to control airspeed, the critical parameter during the final approach.
Tip #2: Fly the Right Airspeed on Final Approach
Use the published final approach airspeed (65 knots or 61 knots for short field approaches), and constantly fight to maintain that speed. Extra airspeed, especially at light training weights, and on short field approaches results in floating and ballooning during the flare.
Consistent approach speeds yield consistent landings.
There is one major caveat to the use of the recommended final approach speed: speed compensation for gusty winds.
For pilots that don’t learn to fly in Kansas wind storms (insert Wizard of Oz joke here), gusty winds are sometimes a foreign weather phenomenon. The generally accepted rule of thumb is to add half of the gust factor to your approach speed. This will help to smooth out the big pitch changes and airspeed deviations.
Become familiar with the associated pitch attitude for normal approaches and short field approaches in the local practice area.
From 1,000 feet AGL, establish the power off, flaps 30° descent at either 65 or 61 knots as approach and become comfortable with the associated pitch attitude.
Note that the 61 knot approach speed has a slightly higher nose attitude, but a steeper descent angle relative to the ground, helpful for clearing all those trees examiners and instructors plant at the ends of runways.
Tip #3: Fly The Airplane Through the Entire Flare
Focus on flying the aircraft to and then beyond the touchdown itself. Doing so eliminates issues of runway alignment and hard touchdowns. Consider the flare as composed of two components: the roundout and the touchdown.
The roundout happens just as the aircraft reaches ground effect. Its purpose is to reduce the rate of descent and bring the aircraft to within a few feet of the ground.
Note: During the flare (especially if you increase power at any point) you could experience a small left-turning tendency due in part to P-factor. Read more about p-factor and how to counteract it here.
Judging the timing of the round out is dependent on proper sight picture. The pilot should be looking toward the end of the runway to judge altitude, with focus on keeping the nose parallel with the runway centerline.
The touchdown continues naturally from the roundout, and begins just above the runway.
The goal is to reduce the descent to something gentle and use elevator back pressure to gently lower the main wheels to the runway. There is no distinct dividing line between roundout and touchdown, but rather one smooth transition.
The transition from final approach to the flare is difficult to judge, but the runway should roughly fill the width of the glareshield (super wide and super narrow runways excluded) before beginning the flare.
The flare should be a smooth transition from nose low to level to slightly nose high. The final pitch target right at touchdown should put the nose on the horizon. Don’t jerk on the controls or pitch up as if initiating a climb (or the plane will climb). A smooth continuous pull is the intended control input, modulate the elevator back force to achieve a steady reduction in descent rate, then hold the aircraft right above the runway.
Keep adding back force to hold the aircraft off until touchdown occurs.
Note that the goal is to add pressure, not pitch attitude. Adding more pitch attitude can cause ballooning and floating.
The important part of this is to keep flying the airplane through the flare until after the main wheels are on the ground.
Tip #4: Get the Nose Up and Keep the Nose Straight in the Flare
As mentioned above, the final pitch attitude should put the nose of the aircraft on or just below the horizon. It should remain there until after the main gear touchdown.
Consider this: when taking off the initial pitch up occurs at 55 knots, with pitch target of the nose on the horizon. When done right the aircraft touches down at roughly the same speed, meaning the same amount of lift and thus angle of attack must occur.
So, the touchdown pitch target and the liftoff pitch target are roughly equal.
This nose high attitude is the final goal, immediately pitching to bring the nose to the horizon results in a climb, rather than an arrested rate of descent.
The second key to smooth landings is to have the aircraft’s centerline aligned with the runway and tracking parallel to the runway. If the aircraft is not tracking straight down the runway, a side load will occur.
This indicates that insufficient or incorrect crosswind inputs were present at touchdown. The left turning tendencies don’t disappear at low power, as the nose rises, be prepared to make minor rudder inputs to keep the aircraft straight.
There are two rows of rivets on the nose of the 172; they make excellent guides for aligning the nose with the centerline. These rivets should parallel the centerline, not converge with it.
Tip #5: Keep Flying After Touchdown
The 172, even in a full stall landing, will touchdown in the 45-50 knot range, and most landings happen well above that speed. That means the airplane is still flying even after touchdown occurs, so keep flying the airplane.
As an experiment, try to hold the nosewheel off the ground for as long as possible after landing, simply keep adding backpressure until the yoke reaches the rear stop. The minimum controllable airspeed for the elevator is in the 25-30 knot range.
After touchdown, relax the backpressure just a “tick” to reduce the angle of attack and keep the aircraft planted, but do not let the nose drop to the ground after landing, set the nose on the ground after landing.
Any crosswind inputs that were required at touchdown are still present. After all of the gear are on the ground, the ailerons should be positioned to full deflection to maximize the crosswind control effectiveness.
Just as crosswind inputs are rolled “out” during takeoff, so to should those inputs be rolled “in” after landing.
Tip #6: Crosswind Landings Are Normal Landings with Extra Finesse
During crosswind landings, use rudder to keep the nose aligned with the centerline; use the ailerons to control left and right drift across the runway. Touchdown upwind wheel first, and gradually lower the other wheels in a 1-2-3 sequence (Upwind Main – Downwind Main – Nose).
This technique is not radically different than crosswind landing technique in nearly all light aircraft. To perfect crosswind landings, practice the following exercises.
First, input the required crosswind inputs early, essentially as soon as the aircraft is on the final approach.
Use as much control input as required to maintain nose alignment and runway centerline, this includes full aileron and rudder deflection. Recognize that this will increase the aircraft’s drag profile necessitating a steeper approach or leaving a touch of power in on the final approach.
Use the crosswind inputs continuously through the rollout increasing control deflection as airspeed slows.
Second, practice slow flight just above the runway, below 50 feet AGL with full crosswind inputs. Use power and pitch to maintain a steady altitude and an airspeed between 60 knots and 65 knots. This develops sight picture and comfort with “cross-controlled” flight controls.
Tip #7: Bounces, Balloons, and Floats are Flare Entries
If a landing turns into a bounce, or a flare turns into a balloon, or the aircraft floats, consider it a second attempt at the flare.
Each has a distinct cause: bounces are caused by touching down with too much airspeed at too high a descent rate, ballooning is caused by initiating a flare with too much pitch rate and/or too much airspeed, while floats result from too much airspeed after entering the flare.
When correcting from a bounce, first remember that one bounce is a mistake, two bounces is a do-over and perhaps a go-around, three bounces is an immediate go-around.
Once a bounce occurs, hold the nose at the horizon and add just enough power arrest the descent.
Placing the nose on the horizon may require lowering the nose; this keeps airspeed from decaying too rapidly. When the bounce is arrested with pitch and power, re-initiate a normal flare, using sufficient control deflection to prevent further bounces. If at any point a stall horn activates, immediately add full power and go-around.
Ballooning is corrected by slightly reducing the pitch attitude and allowing the rate of descent to settle back to normal. Again, adjust the pitch attitude to place the nose on the horizon. If the “bottom falls out” use power to arrest the descent and keep the flight controls effective. If necessary, conduct an immediate go-around.
Floating is the least troublesome issue, simply hold the pitch attitude constant while the airspeed decreases. This requires increasing back pressure, but it allows the aircraft to touchdown normally once the airspeed decays sufficiently. Again, if the “bottom falls out” during the float, a touch of power will arrest the high descent rate and salvage the landing. If too little runway is remaining, go around.
Tip #8: Short Fields Need Short Aim Points
For short field landings, select an aim point that lies 200-300 feet prior to the touchdown point. This allows for the flare and touchdown to occur normally.
The saying “aim small miss small” applies to this situation as well.
So, for a given touchdown point, focus on the relative change of position of a specific point in windshield. If the aim point is moving up, the aircraft will land short, if the aim point moves down, the aircraft will land long; use this relative motion to make adjustments to the final approach path of the aircraft.
Tip #9: Soft Fields Need Soft Touchdowns
Soft field landings are normal landings with one modification: a small power bump immediately prior to touchdown. As the aircraft transitions from roundout to touchdown adding a very slight amount of power will soften the touchdown and lead to a notably smoother landing.
This power increase is primarily an auditory change; the actual RPM difference is less than 150 RPM. Additionally, remember that the 172’s large flight controls allow fine control to very low airspeeds, use that control to gently lower the nose and keep weight off the nosewheel. Do not hesitate to use full elevator deflection to achieve this.
Tip #10: Instrument Approaches Are Stable, Power On Approaches
The pattern speeds and configurations laid out in Tip #1 are inappropriate to the instrument environment. Instead utilize a stabilized approach concept where all configuration changes and speed changes are minimized after crossing the final approach fix.
For approaches with a glideslope or glidepath or straight in non-precision approaches, maintain 90 knots with the flaps up. Crossing the FAF, reduce power to track the glideslope, glidepath or desired rate of descent (approximately 1800 RPM in light winds), leave the flaps in the up position.
Do not lower flaps until in visual contact with the runway, at that point select flaps 10° and reduce power to maintain the glideslope, and continue to land, adding 5 knots of airspeed to the final approach speed.
If flying an approach to a shorter runway, consider using 20° of flaps, but for most runways this is unnecessary.
When conducting circling approaches, use the technique above, but select flaps 10° upon initiating the descent to the runway. After reaching the “base” leg of the circling approach, lower the flaps to 20°. Unless the runway is very short, land using flaps 20° to maximize climb performance in the event of a missed approach.
Conclusion
The 172 despite its notorious status as a trainer is an aircraft that while easy to learn, requires discipline to master. Next time the opportunity to fly a Cessna 172 presents itself, use the tips above to progress toward mastery.
As a bonus, these basic tips also apply as general principals to any aircraft, even jets. Be consistent, be precise, and treat every landing as an opportunity for improvement, and improvement will become reality.


